 |
INFORMATION GUIDE
ALUMINIUM
Introduction
The painting of an aluminium structure requires considerably more care in the preparation than most other surfaces, due to two factors.
- In the extruding process of aluminium, a rolling oil is used as a lubricant which remains on the surface long after the finished product is put into use. This has to be removed before painting can commence otherwise the paint will not adhere properly
- Because the metal is non-absorbent the adhesion of paint can only be mechanical (sitting on top of the metal). Therefore, any form of condensation or contamination will reduce adhesion and result in failure of the paint system.
Preparation (new work)
On unpainted new aluminium the first step to a successful paint finish is the degreasing of the metal. This is best achieved by using NORGLASS WAX & GREASE REMOVER as indicated on the can instructions. With an unused paint brush, applya brushed coat of NORGLASS METAL ETCH GEL (phosphoric acid based) over the metal surfaces and allow the acid to react for 20 minutes. Do not leave METAL ETCH GEL more than 20 minutes before removal. Hose off and allow to dry. Force dry areas along welded seams, corners or rivets with a hot air blower.
Note. At this stage all care must be taken to prevent skin contact with the metal surface, to avoid contamination by body fats. This occurs by condensation due to the different surface temperatures i.e. warm skin and cold metal will cause condensation to settle on the surface and reduce adhesion.
Precaution. When using NORGLASS METAL ETCH GEL wear protective clothing to avoid skin contact, wear goggles to protect the eyes Read all can directions for use and safety precautions If the first coat of paint cannot be applied on the day of cleaning, the prepared surface must be covered to avoid contamination. On dull or weathered aluminium follow the above procedures and remove any powdered aluminium by sanding/scrubbing with a plastic scouring pad and domestic cream cleanser.
Preparation (previously painted)
If the paint condition is generally poor remove it all by sandblasting or paint stripper and prepare as above Alternatively degrease the surface by vigorously scrubbing with a domestic cream cleanser and nylon brush. Hose off and allow to thoroughly dry. Next abrade the surface with medium grade sandpaper by orbital sander, or by hand (using a cork block). If the latter method is used, wear a pair of fabric gardening gloves to prevent skin contact with metal. Remove all loose and flaking paint. Dust off or vacuum the surface and apply NORGLASS SHIPSHAPE PRIMER UNDERCOAT as indicated further on.
Note If there is to be any delay in applying the SHIPSHAPE cover the metal with plastic dust sheets to avoid atmospheric contamination or moisture
NORGLASS SHIPSHAPE PRIMER UNDERCOAT is a 2 pack white Epoxy coating with excellent adhesive properties as well as filling characteristics. Because of its high resin loading, SHIPSHAPE eliminates the need to etch-prime the surface and provides an excellent base for single or 2 pack finish paints. SHIPSHAPE can be applied by brush, roller or spray and produces a satin finish to easily detect surface defects.
Application
Pour the SHIPSHAPE HARDENER into the BASE can (which will give the correct mixing ration of 3: 1) and stir thoroughly to blend both components. Allow to stand for 10 minutes so that the chemical induction process can begin. If spraying, add 25-33% of NORTHANE SPRAYING THINNERS to the mixed paint and apply at 50-70 PSI pressure. Allow the applied paint film 15-20 minutes to tack up and respray with another coat. Additional coats can be applied in the same manner on the same day
If SHIPSHAPE is to be applied by brush or roller, thinning is not recommended. On broad areas, application by a short pile (nap) roller will give the best results. It is important to understand that all primer and undercoats are designed to seal and/or fill the surface being coated and therefore, do not self level like finish coats. The density and texture they provide will require sanding so the smoother the product is applied, the less sanding will be needed later.
Note. Because SHIPSHAPE is constructed with higher resin loadings than other paints, paint runs are more likely to occur if applied too heavily
Where a brush or roller is used, the coating will require overnight curing and light sanding before another can be applied For a superfine finish the last coat of SHIPSHAPE should be wet and dry sanded using 400 grit paper
Note The pot life of mixed SHIPSHAPE is eight hours (minimum at 20 °C). Over coating SHIPSHAPE with other products must not be considered until 24 hrs have elapsed.
Filling
Any cosmetic filling can only be considered after the metal has been coated up with the SHIPSHAPE. The most important step is covering the bare metal as soon as it is cleaned down. The longer it is left exposed the greater the risk of contamination.
Therefore, sealing it off with SHIPSHAPE means any filling that is needed can be done at leisure and without fear of compromising the paint system. Any filling or fairing can safely be done over the lightly sanded SHIPSHAPE. When the filler is cured, sanding back will probably break through the SHIPSHAPE in small areas but this is not a problem. All that is required before further filler or SHIPSHAPE may be applied -is to wipe the bare metal areas over with NORGLASS WAX & GREASE REMOVER to eliminate moisture or other contaminants.
To achieve a perfect background surface the final coat of SHIPSHAPE will need to be fine sanded with 400 wet and dry sandpaper to remove all traces of gloss. Any remaining shiny spots of SHIPSHAPE will denote a hollow, so continue until the spot disappears.
Finishing
At this stage a wide variety of products can be used depending on the performance required. For the best result use NORTHANE. This is the premium finish 2 pack polyurethane which produces a very high gloss with excellent fade resistance and durability. When cured, the paint gives the impression of being a baked enamel finish and has outstanding chemical resistance as well as being waterproof. On boats that are subjected to stone chipping and abrasion NORTHANE affords the best long term protection. (See Testimonial page 4). However, to get the best finish NORTHANE should be applied by spray on large areas because it sets quickly making it difficult to eliminate all brush marks. To achieve a mirror finish, where spraying is not possible the alternative coating is WEATHERFAST ENAMEL, as described further on.
NORTHANE Application
Pour the contents of the NORTHANE HARDENER into the BASE can and stir thoroughly until blended (mixing ratio 2.1 by volume). Add 33% of NORTHANE SPRAYING THINNERS to the volume of mixed paint and re-stir. Pour into the spraying pot and apply at
50-70 PSI.
Note: NORTHANE does not normally require straining prior to use (unless containers have been opened and left exposed to a dusty environment). However most professional painters strain the paint as a matter of good practice and is also our recommendation.
Spraya light coat evenly over the surface and allow 10 to 15 minutes for the film to become tacky. This can be determined by testing the paint on the masking paint. This tack coat is designed to "hold up" the next application of a full bodied pass with the spray gun. At this stage the obliteration of the SHIPSHAPE will determine whether further passes are required. Where NORTHANE White is applied over SHIPSHAPE the one full bodied spray coat may be sufficient to produce a solid looking job and eliminate the need for further coats. However, if dark NORTHANE colours are selected additional coats will be required.
To encourage greater opacity on dark or strong NORTHANE colours, the final coat of SHIPSHAPE can be tinted using NORGLASS Pigment Paste, or decorative tinter. For example, if NORTHANE Fleet Red is selected as the finish colour, the final coat of SHIPSHAPE should be tinted to a light grey.
The use of yellows and oranges are notoriously difficult to obtain coverage when applied over a less than uniform background. Any patchy areas will still show through after several coats of NORTHANE or WEATHERFAST enamel.
This is a problem with all yellow and orange lead free pigments regardless of manufacturer. The only solution is to make sure the background colour is completely uniform before painting i.e. uniformly white, grey, blue etc.
Brush or roller
Do not thin. Allow 10 minutes for the aeration to settle after mixing with the Hardener and then apply direct from the can or paint tray. Apply with a minimum of strokes. Use a good quality short nap roller and new brush. Mask up as if for spraying to reduce working time.
Important' When the final coat of NORTHANE has been applied, no further treatment is required to achieve a mirror gloss finish. However, if the job is completed outside and is not under cover, a tarpaulin or cover must be placed above the job an hour after painting is complete. This covering is to protect the NORTHANE from dew settling onto the Horizontal surfaces and affecting the gloss. If the cover has not been installed by 4 pm in shady areas, some flattening of the gloss level (horizontal surfaces only) will occur and require more sanding and recoating.
Care must also be taken up to 48 hours after NORTHANE has been applied because the finish will "bruise" or "imprint" if pressure is applied to the paint finish.
Where NORTHANE is to be masked up within 48 hours of drying, use only fineline masking tape
WEATHERFAST Enamel Alternative
Complete all previous stages up to FINISHING.
WEATHERFAST Enamel is a carefully modified coating to provide excellent gloss, coverage and durability. Read data sheet information and can directions for use before painting.
Application
Spray -Thin with 25-33% of WEATHERFAST SPRAYING THINNERS and apply at 50-60 PSI Allow to tack off (15-20 minutes) and recoat.
If WEATHERFAST Enamel is applied in an exposed area, allow to become dust free and cover lightly with plastic sheets to avoid dew affecting the gloss as described above.
Brush or Roller -Do not thin Apply directly from the can. In hot weather add 1% of kerosene (10mls to 1 litre) to improve the flow Allow overnight to dry before attempting to recoat. Recoating may be done without further sanding, provided that no more than 4 weeks elapses. Light sand after that time. Clean up with mineral turps.
ESTIMATING PAINT QUANTITIES
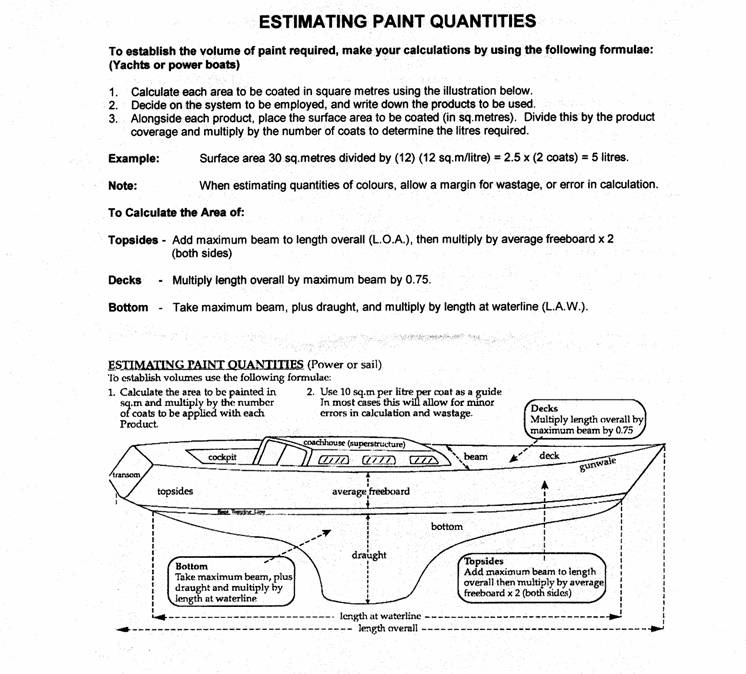
To establish the volume of paint required, make your calculations by using the following formulae: (Yachts or power boats)
1. Calculate each area to be coated in square metres using the illustration below. 2. Decide on the system to be employed, and write down the products to be used. 3. Alongside each product, place the surface area to be coated (in sq.metres). Divide this by the product coverage and multiply by the number of coats to determine the litres required.
Example: Surface area 30 sq.metres divided by (12) (12 sq.m/litre) = 2.5 x (2 coats) = 5litres.
Note: When estimating quantities of colours, allow a margin for wastage, or error in calculation. To Calculate the Area of:
Topsides- Add maximum beam to length overall (L.O.A.), then multiply by average freeboard x 2
(both sides)
Decks -Multiply length overall by maximum beam by 0.75.
Bottom -Take maximum beam, plus draught, and multiply by length at waterline (L.A.W.).
 |