INFORMATION
GUIDE
TIMBER
Introduction
Due
to the vast variety of timbers available and methods of treatment there is
no simple universal coating system for this substrate. Grain densities, oil/sap/resin
absorption values and so on will all play a part in dictating what type of
treatment is best.
The
selection of a protective system is also compounded by the elements the timber
is subjected to. A cool damp environment can be equally as destructive on
a paint system as a hot dry location in outback Australia -but for different
reasons.
With
modern changes in technology came improvements to adhesive compounds (glues)
and equipment to prepare timber better. The results were plywood, particle
board, MDF, copper impregnated pine, and scores of other processes, all designed
with different strengths, textures and characteristics.
BOAT CONSTRUCTION
In
boatbuilding there are 2 main types of timber used. Planks and plywood. Originally
planks of wood were fastened to a skeleton of timber ribs held in place by
long battens called "stringers". These were nailed on with copper
nails (and later with screws). The cracks between the planks then had to be
filled with something called oakum (a resin) and cotton (hemp) to create a
tight seam. This form of boatbuilding was called carvel construction or more
commonly referred to as a "planked hull".
The
problems associated with carvel boats were many. If the planks dried out too
much the vessel would take in water and could sink. If the nails worked loose,
the plank movement then became exaggerated causing the paints to crack. When
this happened, bare timber became exposed and became subject to attack from
a salt water worm called Teredo. Once inside a plank a Teredo worm would devour
the wood in a honeycombing fashion going up and down the full length of the
plank and
growing
to the length of more than a metre and as thick as a man's thumb. At no stage
would the worm break the outer surfaces until the plank finally collapsed.
Many a vessel has gone to Davey Jones Locker through Teredo worm attack.
In
more recent times planks of wood are still used but they are fastened together
with waterproof glues and layered in different directions similar to plywood.
This is called cold moulded construction.
The
other popular boatbuilding medium is plywood, where thin veneers of timber
are glued together at alternate 90 degrees until a "sandwich" of
3-5-7 or 9 layers are formed. The adhesive used to bond these layers is a
waterproof material called Resorcinol Formaldehyde. When finished, plywood
is a very tough material (weight for weight as strong as steel). However,
the Achilles heel of plywood is the end grain. If left exposed, the inner
alternate layers create a "wicking" environment for moisture intake
Gust the same way a tree sucks up water). Once the moisture laden interior
is warmed up and reaches a
threshold
of 25% moisture content the ever-present mould spores become active and devour
the woods cellulose to create the condition commonly called "Dry Rot".
At that point the strength of the plywood is compromised and has to be cut
out and replaced. However if the end grain is totally sealed off with a waterproof
coating in the beginning, plywood is a very durable substrate.
Externally
the exposed plywood consists of only a couple of millimetres before a waterproof
glue line is encountered. By definition "Marine Ply" means that
the outer layers of the timber have a 100% covering of the waterproof glue
so that any moisture cannot penetrate into the inner cores from the face.
Theoretically
tl1is should safeguard the timber from breakdown but with insufficient attention
to the end grain the whole surface becomes vulnerable.
The
commonly held idea of fibreglassing over ply with polyester resin and glass
has had disastrous
consequences
for the boating industry. By adding a rigid reinforced polyester membrane
to the 2mm
timber
veneer the resulting failure is a foregone conclusion. The shear strength
of the reinforced matrix is always going to be significantly greater
than that of the timber. This means that as tension/stress forces are applied,
the timber must separate from the rigid layer
Alternatively,
other reinforcing systems based on more flexible epoxy resins and glass cloth
(as opposed to chopped matt) can provide a more harmonious relationship and
be less inclined to failure. However care and research into the structural
suitability is most important because the shear strength of the epoxy/glass
membrane is always going to be greater than the wood. The optimum reinforcement
for wood is DYNEL cloth and Norglass Laminating epoxy resins. (See Dynel &
Epoxy reinforcing Information Guide).
PREPARATION
Sealing
timber
The
first consideration of any timber surface paint job is to stabilise the moisture
level within the Wood. Once sealed off, the surface will remain constant enabling
a cosmetic coating process to be truly effective. For example, painting a
door without sealing the top and bottom edges will still allow the door to
buckle and warp. In summer it opens freely, because the timber contracts with
the evaporation of moisture and in winter takes in moisture causing the door
to swell and stick. This distortion also stresses the paint layers causing
splits and cracking to occur, resulting in paint breakdown. The common belief
of
not coating all sides of timber to allow it to "breathe" is a myth.
The dimensional stability of wood that has been encapsulated completely by
petrification is the classic illustration of preservation.
To
achieve this state NORSEAL EPOXY WOOD PRESERVER, applied liberally to all
bare timber surfaces will seal it off and prevent moisture ingress. NORSEAL
is a "water-thin" epoxy solution designed to penetrate into the
wood where it then cures gluing fibre to fibre, below the surface.
This
process should be carried out after gluing and filling with NORSTIK EPOXY
GLUE and NORFILL EPOXY FILLER. The reason for this is to ensure that the maximum
bond strength of glue and filler, is to the wood rather than to a coating
of NORSEAL. Any screws or other fastenings added after the NORSEAL application
must be countersunk and filled with NORFILL (White, Teak or Mahogany) or alternatively
recoated with NORSEAL. Screwing through NORSEAL treated timber and leaving
the head exposed can allow moisture to track down the thread into unsealed
territory.
PRIMING/UNDERCOATING
If
a clear finish is desired over NORSEAL, PLEASE NOTE: This is only suitable
for areas that are screened away from direct sunlight because NORSEAL (and
all clear epoxies) have poor UN resistance and will degrade quickly beneath
varnishes and clears. Once they begin to oxidise the clear coatings will crack
and delaminate causing a total failure of the system. However if used internally
or covered up NORSEAL does not require any further treatment. On internal
panelling clear polyurethanes or varnishes are suitable finishes over NORSEAL.
The
selection of a primer should be determined by the finish paint. For example
if NORTHANE (2 pack polyurethane) is the desired finish because of its tough
chemical and abrasion resistance, then SHIPSHAPE PRIMER-UNDERCOAT will be
needed to prepare the surface. This product is balanced in favour of the resins
rather than the pigments, making it suitable as both a primer and an undercoat.
Because it is chemically cured, it will not be reactive to the strong solvents
that are used in NORTHANE, where as other air dried primers or undercoats
would be. With SHIPSHAPE applied over the
NORSEAL,
the surface is now inert and either single or 2 pack finishes can be applied.
This system usually only relates to the outer surfaces of boats or flat, easy
to sand areas because 2 pack finishes such as NORTHANE are not normally used
internally. The reason being, that when NORTHANE eventually needs recoating,
the entire surface has to be sanded to a flat non shiny state to enable the
next coat to adhere properly. In its gloss state NORTHANE is not only chemically
resistant to most things, it is also resistant to itself. Consider the degree
of difficulty in trying to sand between ribs and stringers, hence the need
to sand. In these areas a more user friendly air dried paint system is preferred
because of easier recoating.
This
product would be WEATHERFAST GREY PRIMER or NoRUST ALL SURFACE PRIM
PRIMERS
versus UNDERCOATS.
Primers
are constructed with leafing pigments and special resins so that maximum adhesion
is achieved. If these coatings fail the whole paint system is lost. In addition
to adhesion, pigment density is also very important to shield the substrate
from oxidising or water ingress.
Undercoats
on the other hand, usually only have one function and that is to fill the
substrate profile with a paste of coarse pigments in a slurry of resin. Undercoats
are usually balanced in favour of the pigments to create easy sanding and
do not have any self-levelling characteristics as that would be counter productive
to the filling function.
In
general, undercoats have less adhesion than primers and are only used where
surface filling is required. Painting a metal surface normally needs a primer
then finish coats ...no filling, no undercoat.
Where
filling is necessary to obliterate the timber grain several coats or layers
of undercoat will need to be applied. If applied by brush or roller a light
sanding between coats will cut back the high spots and make for easier filling.
If this is not done, the next coat builds on the high spots as well as the
hollows, which means the contour or surface profile remains the same. This
is not helped by the brush and roller marks which build on each other as the
task progresses. Where the undercoat is sprayed on, a more even distribution
of paint will leave a less corrugated surface which translates into less sanding.
When
the main body of undercoat has been applied, the fairing (or smoothing of
the surface) should be considered as two separate phases. 1. The initial sanding
will cut back the most obvious defects. 2.
The
final sanding needs to be done at a later stage so that film shrinkage is
factored into the equation. It is not uncommon for undercoats to shrink considerably
within a 2 week period after painting. This means any final sanding carried
out before that time will result in further settling or shrinkage and mirror
these defects in the final gloss. This is commonly experienced with reinforcing
layups. Even some months later the weave texture of the reinforcing can show
up as the cosmetic filling contracts ...or the timber shrinks as the moisture
level is reduced.
FINISH
COATS
Interior
areas are normally treated with WEATHERFAST ENAMEL except for showers, chart
tables and eating surfaces where NORTHANE affords more waterproofing and heat
resistance.
Externally
NORTHANE is the preferred finish where maximum durability is desired (given
all practical considerations). For example: A NORTHANE finish on a 3 metre
dinghy is probably "overkill" and not cost effective relative to
the investment. However, a 5 metre half-cabin boat will benefit substantially
from a NORTHANE finish in resale value. Where spraying is not possible, WEATHERFAST
ENAMEL is the preferred option.
Both
products will produce the same high gloss mirror finish except that NORTHANE
will outlast WEATHERFAST ENAMEL up to double the time, and provide better
chemical and abrasion resistance during the process.
On
other areas, WEATHERFAST DECK PAINT and WEATHERFAST clear coatings are the
preferred products as described in the appropriate data sheets.
MAINTENANCE
HINTS
With
all NORGLASS coloured finishes the best colourfast pigments are selected to
maximise the durability. When fading does eventually occur the recommended
treatment is to wash down with detergent and warm water. Using a polish over
an oxidised paint film is only a temporary measure and should be avoided.
This is the time to resurface the area with anew coat of paint. If a polish
is chosen make sure that it does not contain any silicone, as this will create
enormous problems for future repainting programmes.
To
maximise the lasting properties of a wooden boat paint system the answer is
to radius all internal corners with NORFILL EPOXY FILLER at the commencement
stage. However, it can also be done in a repair/repainting operation providing
that 20mm each side of the internal corner is sanded back to show a predominance
of bare wood. Once this area is coved out and painted, water can not lay there
and as a bonus both pieces of wood are strengthened by the NORFILL which in
turn will prevent cracking of the paint layers -the major cause of paint deterioration.
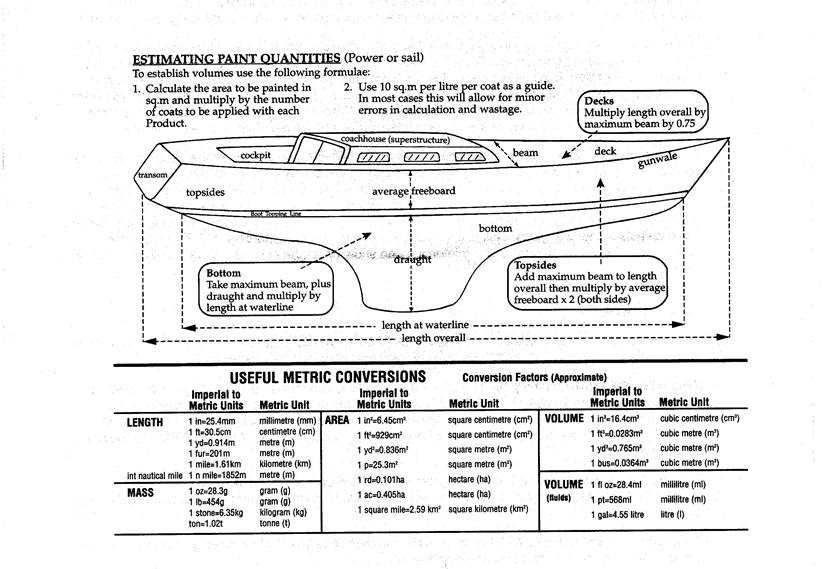
ESTIMATING PAINT QUANTITIES
(Power
or sail) To establish volumes use the following formulae:
1.
Calculate the area to be painted in 2. Use 10 sq.m per litre per coat as a
guide.
sq.m
and multiply by the number In most cases this will allow for minor Decks of
coats to be applied with each errors in calculation and wastage. Multiply
length overall by Product. maximum beam by 0.75
Consult
your supplier for data sheets on the NORGLASS products mentioned herein or
contact:
NORGLASS
ADVISORY SERVICE Ph: (02) 97082200 or Fax: (02) 97963069 Email: norglass@bigpond.net.au
www.norglass.com.au
