NAUTICAL KNOWLEDGE STUDY TEXTS MASTER 24 MTRS
(Extracts courtesy of A.N.T.A. publications, Ranger Hope © 2022 www.splashmaritime.com.au)
Watchkeeping and Navigational Safety
WATCHKEEPING AND NAVIGATIONAL SAFETY
(Extracts courtesy of NSW RMS and A.N.T.A. publications, Ranger Hope © 2022 www.splashmaritime.com.au)
International Collision Regulations
Buoyage
Watchkeeping principles
Master’s instructions to watchkeepers
Manoeuvring difficulties of large vessels
International Collision Regulations
The full collision regulations are presented in the text here. At first these may seem a bit daunting. However, you may find it easier to learn the rules if we consider broadly what each of the three sections in Part B are about, as follows:
Section 1
The rules in Section 1 always apply, regardless of the visibility.
Broadly, every vessel must keep a proper lookout, proceed at a safe speed, be able to determine if a risk of collision exists and know what action to take if the risk does exist.
Section 2
The rules in this section only apply when vessels can see one another (including night time).
It generally implies that when two vessels meet one has the right of way (called the ‘stand on’ vessel) and the other must give way.
Section 3
The rules in this section apply when vessels are not in sight of one another (in restricted visibility).
There is only one rule in this section and it generally implies that every vessel shall proceed with utmost caution and take avoiding action to keep clear of other boats. That is, no one has right of way if they can not see each other.
When learning the collision regulation remember that the rules in section 1 and 2 can go together and the rules in section 1 and 3 can go together, but the rules in section 2 and 3 are mutually exclusive because you can not be ‘in sight of one another’ and ‘not in sight of one another’ at the same time.
When learning these rules highlight key words so that the meaning is not lost and consult your master/facilitator for any memory aids to assist you to remember the rules.
Lights
In addition to Part A (Responsibility and Definitions) and Part B (Steering and Sailing Rules) you must also know Part C (Lights and Shapes) so that you can recognise vessels that you need to keep clear of, particularly at night.
(1) Go through and learn the lights first then come back later and do the shapes.
(2) When learning the lights do not try to learn the whole picture for each vessel but rather separate the groups which make up the big picture. For example, all vessels underway will display side lights and a stern light. If it has one or more white mast lights it is power driven.
Some of the important groups are the ‘all round” lights for ‘trawling’, ‘restricted in ability to manoeuvre’ and ‘not under command’.
Sound Signals (Vessels In Sight Of One Another)
The last section of the Collision Regulations that you need to study is Part D. These are sound signals that can be used when vessels are manoeuvring in sight of one another, and also sound signals for restricted visibility.
Sound Signals (Vessels Not in Sight of One Another)
Rule 35 prescribes the signals for restricted visibility. These signals have to be simple and distinctive or they will not work.
For vessels underway the signals tend to fall into two main groups - power driven boats and nearly all other boats.
Power driven boats sound one long if they are moving through the water and two longs if they take all way off and stop (Rule 35 (a) and (b)).
Nearly all other boats when under way, whether making way or stopped, sound one long and two shorts (Rule 35 (c), (d) and (e)).
Distress Signals
Rule 37 refers to Annex IV, a table of distress signals, which must be learned in full. Rule 36 also refers to signals to attract attention.
Now read and learn the full collision regulations in the text here.
See the online regulations lessons here.
Buoyage
Description Of Buoyage System “A”
As sign posts in the water we use the IALA Buoyage System, developed with the assistance of the International Association of Lighthouse Authorities. The IALA System consists of differing shaped, coloured and lit buoys to identify channels and dangers. IALA has two layout called IALA A and IALA B, both using the same buoys but marking out the channel's direction differently.
IALA A puts lateral port and starboard buoys to left and right of the channel
as entering inward from the sea.
IALA B puts lateral port and starboard buoys to left and right of the channel
as departing outward into the sea.
US, the Amercias, Japan, the Phillipines and other areas of American influence operate IALA Buoyage System B . In UK, Europe and Australia operate the IALA Buoyage System A. For road maps we use navigational charts which show the coastline, dangers such as rocks and reef, the depth of the water and the buoyage deployed.
The buoyage system during the day, uses shape, colour and topmarks whilst at night, colour and rhythm to identify the individual mark. Five basic shapes are: cylindrical (can), conical (cone), spherical, pillar and spar.
Lateral indicates port and starboard hand sides of channels.
Cardinal indicates that deeper water lies to the direction shown, i.e. to the north, south, east or west.
Isolated indicates isolated dangers of limited extent with Danger navigable waters all round them.
Safe Water indicates that there is navigable water all round and under the position, e.g. mid channel buoy.
Special indicates special feature, e.g. spoil grounds, or prohibited anchorages.
Lateral Marks
They are usually positioned to define well established channels and indicate port and starboard had sides of the navigation route into a port. Where there may be any doubt, the local direction of buoyage may be indicated on charts by the symbols. See Fig 1.

Figure 1 Local direction of buoyage may be indicated by one of these symbols.
Lateral Marks.
Remember:
- Port hand mark is coloured red and the basic shape is a can and shows a red light.
- Starboard hand mark is coloured green and the basic shape is conical and shows a green light at night.
When going into port, leave the port hand mark to port. Hence the term, red to red when entering port. When departing it’s the opposite, leave the port mark to starboard.
Make up a series of palm cards for each shape used in the lateral marks.
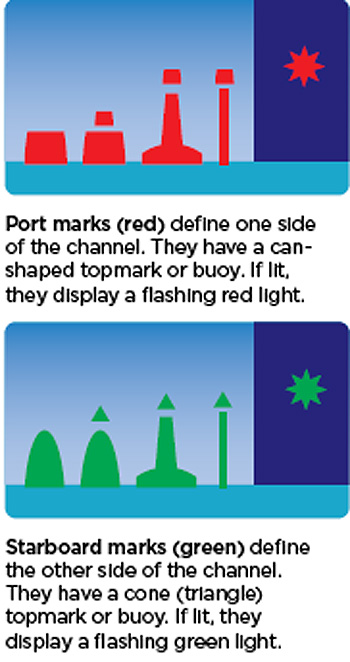
Figure 2 Port and starboard lateral buoys
The Cardinal Marks
There are four cardinal marks:- North, South, East and West. A cardinal mark will indicate where the best and safest water may be found.
A cardinal mark may indicate -
• the deepest water in an area;
• the safe side on which to pass a danger and to draw attention to a feature in a channel such as a bend, junction or an end of a shoal.
Remember: The mariner is safe if passing -
1. North of the north mark
2. East of the east mark
3. South of the south mark
4. West of the west mark.
• both the colour pattern and top mark will indicate which side to pass during the day
• at night the cardinal mark exhibits a white light and its quadrant is distinguished by a specific group of quick or very quick flashes
• associate the number of flashes of each group with that of a clock face, three o’clock east, six o’clock south, nine o’clock west and twelve o’clock north.
When making up your palm cards, note the apex of the topmark always points to where the black is painted on the marker, i.e. north marker apex up, black on top of the marker.
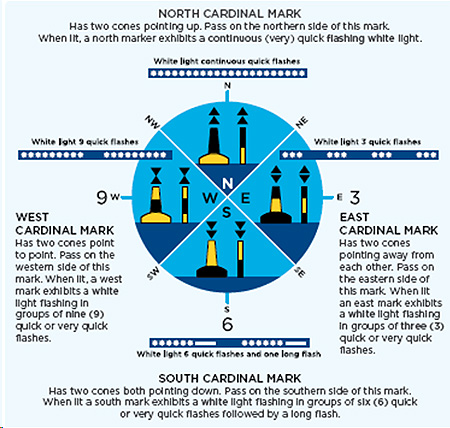
Figure 3 Cardinal marks
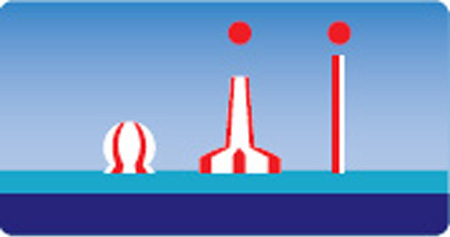
Isolated Danger Marks
Indicates an isolated danger of limited extent which has navigable water all round it e.g. an isolated shoal, rock, reef or wreck - but don’t pass too close.
Remember: - its colour is black with red horizontal bands with two black spheres.
- at night always a white flashing light showing a group of two flashes.
- the characteristics may be best remembered by association of two white flashes with two spheres as the topmarks.

Figure 4 Isolated danger
Safe Water Marks
Indicates that there is navigable water all around the mark, e.g. mid channel or land falls buoy.
Read section on Safe Water Marks.
Remember: - always with red and white vertical stripes
- topmark is a single red sphere
- at night a white light, isophase, occulting, a single long flash every 10 seconds, or Morse A
Special Marks
Indicates a special area or feature such as:
• Traffic separation marks
• Spoil ground marks
• Cable or pipe line marks including outfall pipes.
Also to define a channel within a channel, e.g. a channel for deep draught vessels in a wide estuary where the limits of the channel for normal navigation are marked by red and green lateral buoys. Refer to the chart for the exact meaning.
Read section on Special Marks.
Remember: - it is always yellow in colour
- it may have a single yellow X topmark.
- at night a yellow light with any rhythm, other than those used for the white lights or cardinal, isolated danger and safe water marks (at night).

Figure 6 Special mark
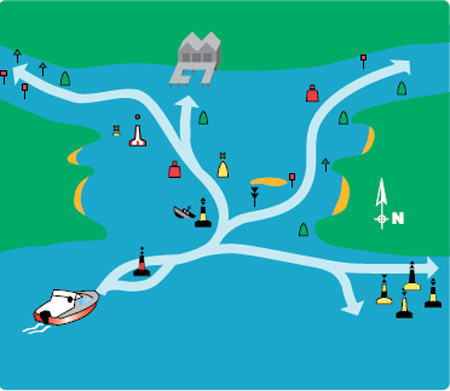
Figure 7 Following the channel IALA A System
See the online buoyage lessons here.
Now make your own set of buoyage memory cards here.
Watchkeeping principles
It is essential at ALL TIMES to maintain a watch on the vessel, adequate to the prevailing circumstances and conditions.
The following are some of the factors that should be taken into account when determining the composition of the watch.
• at no time should the bridge be left unattended.
• weather conditions, visibility, daylight or darkness;
• proximity of navigational hazards;
• use and condition of navigational aids in use;
• whether the vessel is fitted with automatic pilot;
• any additional unusual demands that may be placed on the watch keeper by the operational activities of the vessel.
It is essential that the watchkeepers are well rested and not impaired by fatigue. The watchkeeper should not be under the influence of alcohol or narcotics so as to be able to maintain an efficient and competent watch. If the watchkeeper is not satisfied with the fitness of the relieving watchkeeper to take over the watch, the watch should not be handed over and other arrangements made with the master’s instructions as to the relieving watchkeeper.
Navigation
The intended voyage must be planned, taking into account all pertinent information and any course laid down shall be checked before the commencement of the voyage.
Frequent checking of the vessels position utilising all the available navigational aids, cross referencing the accuracy of one method with another, ensuring that the vessel follows the desired course.
The watchkeeper should also have a full understanding of the operation and limitations of all the safety and navigational equipment available.
The watchkeepers duty is primarily that of keeping watch and should not be required to carry out any additional duties that could interfere with the keeping of a safe navigational watch.
Navigational equipment
The watchkeeper should have an good working knowledge of the navigational equipment at his disposal, taking into account the limitations, errors and idiosyncrasies of the equipment in use. The watchkeeper shall not hesitate to use the helm, engines or sound signalling appliances of the vessel.
Watchkeeping duties and responsibilities
A watchkeeper is not to leave the bridge unless he/she is properly relieved.
Regardless of the presence of the Master in the wheelhouse the watchkeeper continues to responsible for the safe navigation of the vessel till the Master expressly takes over the con of the vessel. If in any doubt as to the safety of the vessel the watchkeeper shall notify the Master immediately.
Taking over the watch - Standing orders
When taking over the watch the relieving watchkeeper shall satisfy him/herself of the vessel’s position, confirm its intended course/track and speed and note any dangers to navigation or alterations of course expected during the watch.
The hand over should include but not be limited to:
• standing orders and other special instructions of the master relating to navigation of the vessel
• position, course, speed and draught of the vessel
• prevailing and predicted tides, currents, weather, visibility and the effect of these factors upon course and speed
• navigational situation
• the operational condition of all navigational and safety equipment
• the errors of magnetic and gyro compasses
• the presence and movement of vessel in sight or known to be in the vicinity
• the conditions and hazards likely to be encountered during the watch
• machinery state
• cargo state
• state of auxiliary vessels/tenders
• operational activities
Watchkeeping at anchor
The watchkeeper will ensure that the vessel maintains her position at anchor. In addition keeping the following points in mind:
• Ensure that an effective lookout is maintained.
• Ensure that periodic inspection rounds of the vessel are carried out.
• Notify the master and undertake all necessary measures if the vessel drags anchor.
• Ensure the engines and auxiliary machinery is ready as per the masters instructions.
• State of tide.
• Position of other vessels at anchor or passing traffic in relation to the swinging circle of the vessel.
• State of the weather and the latest forecast.
• Position of appropriate beam bearings for early warning of dragging anchor.
• The condition and lay of the anchor and cable/rope.
• Ensure that the correct lights or shapes are exhibited at all times.
• Take measures to prevent environmental pollution and comply with pollution regulations.
Watchkeeping in port
• Ensure that the vessel is moored securely at all times.
• Ensure that there is adequate and safe access to the vessel from the wharf.
• The state and range of the tide and the effect this would have on the mooring ropes and the gangway.
• Appropriate signs are up in relation to the working of the vessel.
• Know who is onboard the vessel both from the vessels crew or shore personnel.
• Put up appropriate notices with regards to the sailing time of the vessel etc. for the benefit of the crew.
Master’s instructions to watchkeepers
The watchkeeper should inform the Master immediately in the following circumstances:
• if restricted visibility is encountered or expected.
• if the traffic conditions or the movement of other vessels is causing concern.
• if difficulty is experienced in maintaining course.
• on failure to sight land, a navigational mark or to obtain soundings by the expected time
• if, unexpectedly, you sight land, a navigational mark or to obtain soundings.
• on the breakdown of engines, steering gear or any essential navigational equipment.
• if the radio equipment malfunctions.
• in heavy weather if in any doubt about the possibility of weather damage.
• if the vessel meets any hazard to navigation such as ice or derelicts.
• in any other situation in which he/she is in any doubt.
Despite informing the master in any of the above circumstances the watchkeeper must take immediate action if necessary to ensure the safety of the vessel, where the circumstances require.
To drive a large vessel the operations of steering,
engine control and monitoring the electronic aids to navigation are often
delegated to specialist crewmen. The master or the officer of the watch is
directs this team in the
process that is called “conning the vessel”. The consequences of misunderstanding an order
from the person responsible for conning the vessel could be dire, so a formal
dialogue is used to limit such risks.
Engine
controls
Master “ Slow ahead port, sailor”.
Sailor “ Aye,
aye, slow ahead port, sir”.
The control setting should be left
in this setting until further orders are received.
Master “ Full ahead starboard, sailor”.
Sailor “ Aye,
aye, full ahead starboard, sir”.
The control setting
should be left in this setting until further orders are received.
Master “ Ahead on both 800 revolutions, sailor”.
Sailor “ Aye,
aye, ahead on both 800 revolutions, sir”. And when both engine have slowed.
Sailor “ Now
steady on ahead both 800 revolutions, sir”.
The control setting should be left in this setting until
further orders are received.
Master “ Slow astern, starboard, sailor”.
Sailor “ Aye,
aye, Slow astern, port, sir”.
Master “ Listen again, sailor,
slow astern starboard”.
Sailor “ Aye,
aye, slow astern, starboard, sir”.
The control setting should be left
in this setting until further orders are received.
Helm controls
The
directional orders for steering may be:
a. by rudder - to the
displayed angle on the rudder indicator.
b. by compass - to the
required course.
c. visual - to steer for a distant feature or object.
Rudder
indicator
Master “ Steer 10º to port, sailor”.
Sailor “ Aye,
aye, going 10º to port, sir”. And when the rudder indicator
shows 10º to port.
Sailor “ You
have 10º to port, sir”.
The wheel should
be left in this setting until further orders are received.
Master “ Hard to starboard, sailor”.
Sailor “ Aye,
aye, going hard to starboard, sir”. And when the rudder
indicator shows 35º to starboard.
Sailor “ You
have 35º starboard helm, sir”.
The wheel should
be left in this setting until further orders are received.
Master “ Ease to amidship, sailor”.
Sailor “ Aye,
aye, easing to amidship, sir”. And when the rudder indicator shows 0º to starboard.
Sailor “Helm
amidship, sir”.
The wheel should
be left in this setting until further orders are received.
Compass
Master “ Steer 220º, sailor”.
Sailor “ Aye,
aye, going 220º, sir”. And when the compass shows 220º.
Sailor “ Steering
220º, sir”.
The vessel should
be kept on this course until further orders are received.
Visual
Master “ Maintain a ships length off the bank, sailor”.
Sailor “ Aye,
aye, a ships length off the bank, sir”.
The vessel should
be steered to keep a ships length distant from the bank until further orders
are received.
Combined
Master “ Ease to amidships, sailor”.
Sailor
“Helm amidship, sir”.
Master “ Steady by compass, sailor”.
Sailor “ Aye,
aye, steady by compass, sir”.
The vessel should
be kept on this course that the compass now reads until further orders are
received.
Master “ Ease to amidships, sailor”.
Sailor
“Helm amidship, sir”.
Master “ Steady as she goes, sailor”.
Sailor “ Aye,
aye, steady as she goes, sir”.
The vessel should
steered for the object now sighted dead ahead until
further orders are received.
While a smaller vessel with fewer crew
may be much less formal, the consequences of misunderstanding are no less
severe. Similar principles must be adopted especially when getting it right
first time counts.
Manoeuvring difficulties of large vessels
Larger vessels due to their size, hull form and power are not as manoeuvrable as smaller vessels. Fighting the wheel to keep a vessel dead on the lubber line in a following sea will be less effective than allowing it to yaw (swing) within its natural motion.Stopping distances are increased by the huge momentum of a large vessel. Turning circles are large and response to the helm relatively slow, all these factors make it harder for a larger vessel to make swift and nimble manoeuvres as can be made by most small vessels. In light of the above the Master on a small vessel must bear in mind these constraints on a larger vessel before impeding it’s path or passing so close so as to not allow any margin for error or the manoeuvring characteristics of the larger vessel.
Turning factors
Many operational factors will affect the vessel’s ability to turn. Therefore, the rate of turn and turning circle will be influenced by these factors:
Trimmed by the stern
• pivot point moves aft
• increases turning circle diameter
• will steer well
• develop maximum power
Trimmed by the head
• pivot point moves forward
• smaller turning circle
• difficult to turn
• does not develop full power
Displacement loaded
• slow to answer helm
• larger turning circle
• turning circle normally not affected by speed
• slow in gathering way
Light
• responsive to helm
• smaller turning circle for same speed if loaded
• turning circle will increase with speed
• wind affected
• responsive to engine movements
List
• turns readily to high side
• smaller turning circle to high side
• twin screw - low screw more effective
Available depth of water in relation to shallow water effect.
The fixed turning factors include: the vessel’s propulsion arrangement, the type of rudder and hull design.
Turning
The rate of turn and the turning circle is affected by the amount of rudder applied.
Small rudder angles will result in large turning circles with minimum loss of speed.
Large rudder angles may reduce the turning circle, develop excessive drag and therefore reduce speed.
Most vessels use 15° - 20° of rudder as standard wheel for course alterations. Whilst manoeuvring, greater angles are applied. Standard wheel is therefore, the most effective amount of rudder to use without developing excessive drag and reduction of speed.
Turning circle
Every Master needs to appreciate the turning ability of their vessel, i.e. the distance it takes to turn and the time it takes to complete the manoeuvre. The turning circle represents the vessel’s path through 360° whilst keeping the engine revolutions and rudder angle constant throughout the turn. The turning circle is drawn from data obtained from turning trials.
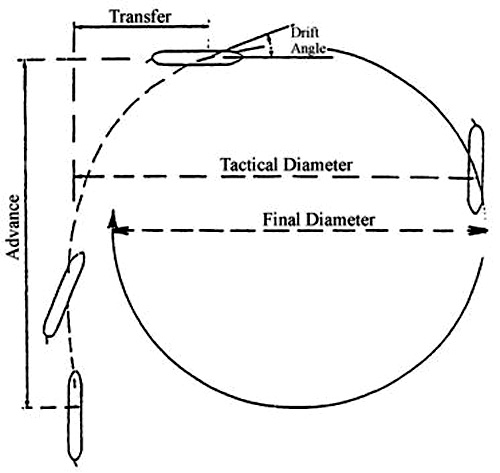
Figure 8.Turning Circle
Advance: distance measured on the original course until the turn is completed.
Transfer: the distance measured at right angles off the original course until on the new course.
Tactical diameter: greatest diameter measured from the original course when the vessel is 180° into the turn.
Final diameter: the internal diameter of the complete turning circle.
Drift angle: the angle between the fore and aft centre line point perpendicular to the centre of the turning circle on the vessel’s path.
Turning data sheet
When undergoing turning trials the data sheet is used to compile the turning
characteristics of the vessel.

Turning trials
should be conducted in relative calm weather, negligible tidal, stream current
and where the vessel will not be subject to shallow water effect.
LOA 35
metres
Displacement 130 tonnes
Twin
screw
Twin
rudder

Examine the data for a turn of 90°. The vessel advances 199 metres, transfers 109 metres and takes 57 seconds to complete.
Practical appreciation
The Master can identify specific handling features from the turning data and use these to advantage; e.g.
• will turn quicker to port
• have a smaller turning circle to port
Loss of speed when turning
If the rudder angle and revolutions are kept constant a vessel altering course will experience a reduction in speed.
Example: a displacement hull vessel.
Degrees of alteration speed reduction
0-20° minimal
20-90° reduction 1/3 of initial speed
>90° generally remains steady at 1/3
Obviously different hull designs, propulsion systems, rudder angle and speed will vary the results illustrated in the example.